

But I had to do something to save my favorite pajamas! Let me explain. In 2008, I went to Disney World. I'm a total Disney freak, it was my 16th visit, it was Christmas, and I was six months preggo with my older son, Danger. So I was pretty much as happy as I could get, despite the fact that 14 hours a day of Disney magic made my cankles look like legit water buffalo hooves.
Anyway, I bought a pair of awesome pajama pants while I was there. I loved the fabric -- hot pink, day-glo orange, lime green, turquoise, red, and black. It was borderline vaudeville and borderline tacky, and I wore them almost every night (and some days) for about two years, until they finally ripped. Hubby suggested it was finally time to get rid of them. I'm pretty sure I heard joy in his voice -- I think these pants were his Leg Lamp. "I am never throwing these out!" I proclaimed. "I will make them into a quilt!"
Cue one year later and the pants were still sitting on a shelf in my office. "Can we throw these out now?" hubby asked. We were in the middle of a 365 project in which we threw out one item a day, so I had to get going on the quilt or the pants would be tossed.
The only problem was I had never made a quilt before. But between a vague recollection of seventh grade Home Ec, a helpful Joann's Fabrics employee (who patiently fielded questions like, "what's batting?" and "how do you put all the layers together?"), and occasionally checking Pinterest to make sure I wasn't screwing up royally, I managed to cobble it together. Here's a basic patchwork quilt tutorial, if you can call it that. I won't use any technical terms because I don't know them.
STEP 1: Pick out a crap ton of fabric. If you're not familiar with fabric, it's usually 54" wide -- you order the length you need in yards. I bought two yards for the back of the quilt, plus a cumulative 2-3 yards for the front of the quilt. Err on the high side for the front, since you'll lose a lot of square inches while sewing. I got a full yard of polka-dot blue for the front, 1/2 yard of orange, 1/2 yard of lime, 1/2 yard of hot pink, and had about 1/2 yard after I cut up my pants. The cotton and flannel fabrics are usually cheapest, which is good when you need a lot of yardage and there's a distinct chance you're going to ruin everything and/or give up.
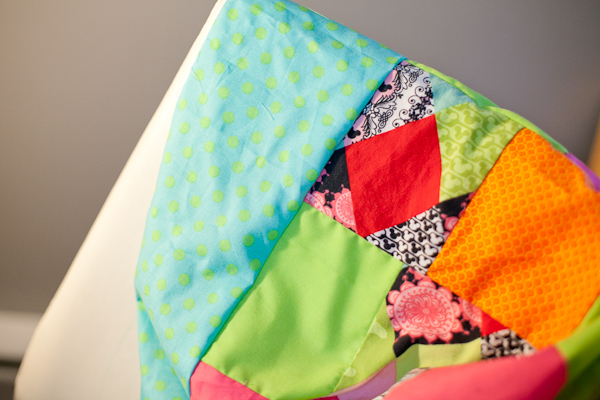
STEP 2: Cut fabric into 6-inch squares. My quilt is about 4' x 5', which required 96 squares. (Save some for the trim -- a little over half a yard.)
STEP 3: Make a map. This is nerdy, but it was a huge help. I didn't want to have three big squares of lime next to each other, or to get halfway through the quilt and realize I'd run out of Mickey squares.

STEP 4: Lay the first two squares front-to-front and sew the right edge. Set your sewing machine to go in a straight line, pretty tight stitch. I don't know what the settings are actually called, but I do know that my one-year-old, Dash, changed them every single time I walked away from the sewing machine for more than three seconds.

STEP 5: Keep repeating step 4 (front-to-front, sew right edge) until you have a full line of fabric squares:

STEP 6: Roll it up and stick a label on it so you know which line it is on your map. Not vital, but it'll save you a lot of time and brainpower later.

STEP 7: Do the above steps for each line in your quilt-map.

STEP 8: Take line 1 and line 2 and lay them face-up on the floor. Flip line 2 over so it's facedown on line 1, and sew the bottom edge. I forgot to take a photo of this step, but it's probably fairly intuitive. If it makes your fabric squares start to look like a real patchwork quilt, you did it right! (If this makes no sense at all, do a Pinterest search, and godspeed.)
STEP 9: Once you have the full patchwork portion of the quilt sewn together, you can cut your trim pieces. First, you'll need two pieces that are 6" wide (or whatever looks good to you) x (the length of your quilt).
STEP 10: Lay the trim facedown against the left edge of your patchwork, and sew the left edge. Then do the same thing on the right side of your patchwork, sewing the right edge. For reasons unknown, I took three photos of this step.


STEP 11: Cut another two pieces of trim -- this time, 6" wide x (the width of your quilt). It's important to save this cutting until now, so you know how wide your quilt is after the left and right trim pieces are added. Unless you're a master quilter and really good at measuring, in which case, why are you reading this tutorial? I told you I don't know what I'm doing!
STEP 12: Sew the trim on the top and bottom, the same way you did on the left and right. Now you have a finished front piece!
STEP 13: Cut the back piece of fabric to the same size as the front.
STEP 14: Go buy some batting. (If you already have batting, because you knew you'd need it way back in the title when I said the word "quilt," then you're a step ahead of me.) Cut the batting to the same size as the front and back of the quilt.
STEP 15: Make a quilt sandwich. Front side (face up), batting, back side (face down). Oh -- if you want to "sign" the quilt, now's the time to do it, before you close it up.
STEP 16: Pin the edges together. If you want to tack the quilt, you can do that now. Basically, just take embroidery thread, and at various points in the patchwork, loop the needle through all three layers of fabric and back, and tie it in place. This just keeps the binding from bunching up when you wash it. There are other, more complicated ways to do this, but I didn't try any of them.
STEP 17: Bind the edges. Okay, this step could probably use its own tutorial, but if you buy pre-made binding, it's actually fairly intuitive and easy. Ask the people at Joann's -- they're really nice. Just fold the binding under at the corners for clean edges.

...and there you go! A quilt you can brag about for generations to come. And a great way to rescue your favorite pajamas, baby clothes, old shirts, etc.
I'm exhausted.


