Sunday, February 26, 2012

Live Blogging the Oscars Even Though I've Only Seen One or Two Movies This Year

As far as I can remember, the only Oscar-nominated movie I've seen ths year was Bridesmaids. Well, I also saw The Social Network, but that was nominated last year, or maybe the year before.

So naturally I feel obligated to live blog and offer my extremely educated opinions. Mostly because if I just sit and watch, I'll die of boredom. I'll probably take a long ice cream break, shower during the lifetime achievement crap, and fall asleep at 10:05. Here goes.


The Oscar I usually watch.

The Oscar I'm watching tonight. Decidedly less informed about this one.
8:37 p.m.
Martin Scorcese's daughter (I'm assuming that's his daughter?) looks as enthralled as I am.

8:43
I honestly thought Hugo was animated. (My husband just said, "We can be in Mordor by sundown!" Because he looks like Ian McKellan?) (The guy from Hugo...not my husband.)

8:47
I was more excited about the Ellen commercials tonight than the show itself. I can go to bed now. Just kidding! I haven't even had ice cream yet.

8:52
Why are we retrospect-ing already? The show's been on for 20 minutes.
I appreciate the irony in J-Lo saying a woman's dress should be loose enough to show she's a lady. She looks like boobs in Saran wrap. And I can see 50% of her butt cheek.

9:00
Are we reminiscing about our first movie? Mine was Follow that Bird. Starring Big Bird. He gave a convincing performance.

9:05
Seriously? My two year old is awake? Go back to sleep!

9:06
I miss Sandra Bullock's face. I mean that literally -- I miss the face she had last year.

9:11
I freakin' love Melissa McCarthy. I hope everyone voted for her.
Oh. Nope.

9:13
Okay, now I love Octavia Spencer too.

9:20
Let me just say this is a 100% accurate portrayal of focus groups.

9:22
Tina Fey and Bradley Cooper! Girl crush and boy crush!

9:25
"Let's get out of here, we're editors" will probably stand as my favorite acceptance speech of the night.

9:26
"Hugo." "No, HU-go." I just threw up in my mouth.

9:30
Snack time. Why aren't Reese's Eggs available year-round?

9:36
Cirque du Soleil = awesome. OMG IS THAT GIRL SPINNING ON ONE ARM EVEN KIDDING? Insane.

9:42
Nominees for Best Documentary: Hmm? Huh? What? And Who?

9:46
My husband is officially asleep. That pretty much cuts the number of people paying attention to my obnoxious commentary in half.

9:58
Okay, so I just took a Words With Friends break....did I miss anything? I'm guessing no.

10:09
Mind-reading bit = not funny at all. Brad Pitt has a lot of kids! Martin Scorcese directs movies! Ha ha ha haaaa I should go to sleep.

10:12
It's Lightning McQueen!

10:25
I'm losing interest. Even Angelina can't save me now.

10:53
Just spent 25 minutes on Pinterest. Looks like the show has stayed mostly boring.

10:56
Governers Awards? I'm going back to Pinterest.

11:11
Make a wish! I wish I were asleep.

11:20
Jean Dujardin is a handsome man.

11:29
Yay Meryl Streep. I'm going to sleep. <-- That's poetry.
Sorry, Best Picture. I'm trying to care enough! But I don't.

Friday, February 24, 2012

SLOW COOKER RECIPE: Honey-Balsamic Pulled Pork

Why am I sitting here at 10:22 at night, eating pulled pork? Because this pulled pork was awesome. So awesome that I....

Forewent?? Is that really the past tense of forego?

Okay then. I forewent my usual cookie dough ice cream for a second helping of cold, leftover pork. Yeah. This is serious. I'm not sure I can choose a winner between this and my reigning favorite pulled pork recipes (cuban pork and mesquite pulled pork a.k.a. "porkgasm") but it's definitely on the podium somewhere.

My inspiration was a recipe for sliders I found here, but with a few substitutions and some major simplification.


You'll need:
  • 1-2 lbs. pork
  • 1/2 cup broth (I used beef broth)
  • 1 cup balsamic vinegar
  • 3/4 cup ketchup
  • 1/3 cup brown sugar
  • 1/4 cup honey
  • 1 Tbsp. Worcestershire sauce
  • 1 tsp. ground mustard
  • 1 T. minced garlic
  • 1/2 tsp. Papa Joe's salt

No prep work needed, just dump it all in the crockpot and cook on low for 6-8 hours.

And then sneak into the kitchen later and have some as a bedtime snack. Trust me.

Wednesday, February 15, 2012

EASY PEASY RECIPE: Turkey-Vegetable Meatballs with Spaghetti Squash

I'm attempting to lose the last of my baby weight, since my baby is almost, um, two years old. So I'm trying to ease up on the carbs. But easing up on carbs makes me think about carbs, which makes me crave carbs, which makes me want to stuff my face with a giant plate of spaghetti and meatballs.


Nope, I didn't cheat. That's not spaghetti, and the meatballs are stuffed with spinach, mushrooms, and carrots. Hold on while I pat myself on the back! By the way, this is one of those recipes that sounds obnoxious and braggy but is actually really easy. Five or 10 minutes to prep, 25 minutes to bake.

You'll need:
  • 1 lb. ground turkey
  • 1 egg
  • 1/4 cup grated romano
  • 2 Tbsp. garlic
  • 1 cup spinach (frozen, thawed)
  • 5-10 baby carrots (chopped)
  • 5-6 white mushrooms (chopped)
  • 1/4 cup bread crumbs


Chop the veggies to smithereens. I swear by my chopper from Pampered Chef. 


Mix everything in a bowl and squish it up good.


Doesn't that just LOOK virtuous?

Rub olive oil on the bottom of a casserole dish, and roll the meat sludge into 2" balls.


Bake at 375 degrees for 25 minutes or until the meatballs start turning slightly golden-brown.

I should have taken a photo of the spaghetti squash, but I was too busy scalding my fingertips on it. But it's easy. Stab some holes in it, throw it in the microwave for 10 minutes, wait a few minutes for it to turn from molten lava back into a vegetable again, slice it in half, scrape out the seeds, and then just start scraping out the "spaghetti." I topped it with Classico Spicy Red Pepper tomato sauce.

Does it taste like spaghetti? Not at all! But at least my eyeballs think we're eating spaghetti, and I can twirl it on my fork, so that's something. Plus, I snuck five vegetables (well, four vegetables and a fruit, for the tomato nerds) into one meal. I'm like that girl who wrote the book about sneaking spinach into her kids' brownies -- except, you know, not famous or wealthy.


Shared this recipe on Real Food Wednesday at Kelly the Kitchen Kop.
And thanks to Brianne at Cupcakes and Kale Chips for pointing me towards RFW!

Tuesday, February 7, 2012

EASY-PEASY RECIPE: 20-Minute Chili (And It's Healthy!)

Hi! Sorry for the lapse in blogging, but I just got back from a lovely and relaxing four-week sabbatical in Paris.

bonjour je suis vraiment à paris c'est fromage!
Okay, that's a lie.

I've just been super busy and fell way behind on the updates. And then once I was a week behind, nothing seemed interesting enough after all the anticipation! (What's that, you say? You weren't waiting on the edge of your seat for another blog post? Shhh! Don't tell me that!) And then the longer I waited, the more interesting I felt I needed to be upon my return.

But today I decided -- screw being interesting! I'm just going to jump back in and post a recipe for chili!

I already have a recipe on here for slow-cooker chili, but tonight I got a hankerin' for chili* at about 4:47 p.m. So, I had to make do. This recipe is totally diet-friendly, by the way, which is important because I've spent the past week eating Slutty Brownies after almost every meal. It's been a bad scene.

This chili can be ready, start to finish, in 20 minutes.

You'll need:

  • 1 lb. ground turkey
  • 2 Tbsp. chili powder
  • 1 Tbsp. paprika
  • 1 1/2 Tbsp. Mrs. Dash Southwest Chipotle blend
  • 1 tsp. cumin
  • 10-oz. can diced tomatoes
  • 8-oz. can tomato sauce
  • 1 cup beef broth
  • 1 1/2 Tbsp. cider vinegar
  • 2 cups beans (I used a mix of black and kidney)
  • 1/2 tsp. sea salt and pepper (I used Papa Joe's salt as usual)
  • 1 tsp. onion powder

In a big sauce pot, cook the ground turkey in some olive oil. Once it's brown, add all the other stuff and simmer for 15 minutes. That's it. C'est tout, c'est finit. Wasn't that easy?


Okay. More updates, more often. I promise.

* Did you know this is the gerund form of the word hanker? I could also say, "I hanker for chili." I think I'm going to start using that.

Tuesday, January 10, 2012

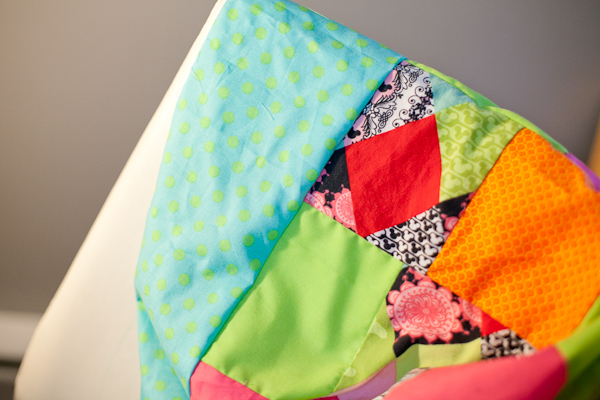
CRAFTY STUFF: I made a patchwork quilt. Don't judge me.

Okay, I know this is way beyond my normal level of craftiness, which is zero. (If you don't believe me, click the "crafts" tab. I think I'm up to a whopping two posts.)


But I had to do something to save my favorite pajamas! Let me explain. In 2008, I went to Disney World. I'm a total Disney freak, it was my 16th visit, it was Christmas, and I was six months preggo with my older son, Danger. So I was pretty much as happy as I could get, despite the fact that 14 hours a day of Disney magic made my cankles look like legit water buffalo hooves.

Anyway, I bought a pair of awesome pajama pants while I was there. I loved the fabric -- hot pink, day-glo orange, lime green, turquoise, red, and black. It was borderline vaudeville and borderline tacky, and I wore them almost every night (and some days) for about two years, until they finally ripped. Hubby suggested it was finally time to get rid of them. I'm pretty sure I heard joy in his voice -- I think these pants were his Leg Lamp. "I am never throwing these out!" I proclaimed. "I will make them into a quilt!"

Cue one year later and the pants were still sitting on a shelf in my office. "Can we throw these out now?" hubby asked. We were in the middle of a 365 project in which we threw out one item a day, so I had to get going on the quilt or the pants would be tossed.

The only problem was I had never made a quilt before. But between a vague recollection of seventh grade Home Ec, a helpful Joann's Fabrics employee (who patiently fielded questions like, "what's batting?" and "how do you put all the layers together?"), and occasionally checking Pinterest to make sure I wasn't screwing up royally, I managed to cobble it together. Here's a basic patchwork quilt tutorial, if you can call it that. I won't use any technical terms because I don't know them.

STEP 1: Pick out a crap ton of fabric. If you're not familiar with fabric, it's usually 54" wide -- you order the length you need in yards. I bought two yards for the back of the quilt, plus a cumulative 2-3 yards for the front of the quilt. Err on the high side for the front, since you'll lose a lot of square inches while sewing. I got a full yard of polka-dot blue for the front, 1/2 yard of orange, 1/2 yard of lime, 1/2 yard of hot pink, and had about 1/2 yard after I cut up my pants. The cotton and flannel fabrics are usually cheapest, which is good when you need a lot of yardage and there's a distinct chance you're going to ruin everything and/or give up.

STEP 2: Cut fabric into 6-inch squares. My quilt is about 4' x 5', which required 96 squares. (Save some for the trim -- a little over half a yard.)

STEP 3: Make a map. This is nerdy, but it was a huge help. I didn't want to have three big squares of lime next to each other, or to get halfway through the quilt and realize I'd run out of Mickey squares.


STEP 4: Lay the first two squares front-to-front and sew the right edge. Set your sewing machine to go in a straight line, pretty tight stitch. I don't know what the settings are actually called, but I do know that my one-year-old, Dash, changed them every single time I walked away from the sewing machine for more than three seconds. 


STEP 5: Keep repeating step 4 (front-to-front, sew right edge) until you have a full line of fabric squares:


STEP 6: Roll it up and stick a label on it so you know which line it is on your map. Not vital, but it'll save you a lot of time and brainpower later.


STEP 7: Do the above steps for each line in your quilt-map.


STEP 8: Take line 1 and line 2 and lay them face-up on the floor. Flip line 2 over so it's facedown on line 1, and sew the bottom edge. I forgot to take a photo of this step, but it's probably fairly intuitive. If it makes your fabric squares start to look like a real patchwork quilt, you did it right! (If this makes no sense at all, do a Pinterest search, and godspeed.)

STEP 9: Once you have the full patchwork portion of the quilt sewn together, you can cut your trim pieces.   First, you'll need two pieces that are 6" wide (or whatever looks good to you) x (the length of your quilt).

STEP 10: Lay the trim facedown against the left edge of your patchwork, and sew the left edge. Then do the same thing on the right side of your patchwork, sewing the right edge. For reasons unknown, I took three photos of this step.


STEP 11: Cut another two pieces of trim -- this time, 6" wide x (the width of your quilt). It's important to save this cutting until now, so you know how wide your quilt is after the left and right trim pieces are added. Unless you're a master quilter and really good at measuring, in which case, why are you reading this tutorial? I told you I don't know what I'm doing!

STEP 12: Sew the trim on the top and bottom, the same way you did on the left and right. Now you have a finished front piece!

STEP 13: Cut the back piece of fabric to the same size as the front.

STEP 14: Go buy some batting. (If you already have batting, because you knew you'd need it way back in the title when I said the word "quilt," then you're a step ahead of me.) Cut the batting to the same size as the front and back of the quilt.

STEP 15: Make a quilt sandwich. Front side (face up), batting, back side (face down). Oh -- if you want to "sign" the quilt, now's the time to do it, before you close it up. 

STEP 16: Pin the edges together. If you want to tack the quilt, you can do that now. Basically, just take embroidery thread, and at various points in the patchwork, loop the needle through all three layers of fabric and back, and tie it in place. This just keeps the binding from bunching up when you wash it. There are other, more complicated ways to do this, but I didn't try any of them. 

STEP 17: Bind the edges. Okay, this step could probably use its own tutorial, but if you buy pre-made binding, it's actually fairly intuitive and easy. Ask the people at Joann's -- they're really nice. Just fold the binding under at the corners for clean edges.


...and there you go! A quilt you can brag about for generations to come. And a great way to rescue your favorite pajamas, baby clothes, old shirts, etc.

I'm exhausted.

Sunday, January 8, 2012

Smores Fun, Part 2: Portable Smores

I love smores. Campfires? Not so much. I have a wicked case of pyrophobia. Just lighting a candle at home requires serious strategy and vigilance -- Will I be home the rest of the day? There's no chance of me leaving the candle unattended, as the label explicitly warns against? OMG, did an ember just fly off when I blew it out? I'd better go look for it.... So a forest fire is my personal equivalent of a 25-foot python or a hairy spider the size of your fist. Which makes camping difficult, because I have to stay up all night making sure our fun smores-fest isn't going to burn down the Pine Barrens.

I guess my point is, these smores are much easier. And less messy. And they last for days and travel well in a Ziploc bag. All good things!


You'll need:

  • jumbo marshmallows
  • melting chocolates (I got them at Michael's)
  • graham crackers
  • wax paper (preferably...but a cookie sheet would work)

STEP 1: Crush one sleeve of graham crackers. I put them in a plastic baggie and used the flat side of a meat tenderizer. Ideally, stop when they look like tiny graham cracker crumbles, but before they turn into powder (but powder's okay, too). Pour the crushed grahams into a small bowl.

STEP 2: Melt the chocolate using the instructions on the bag. Don't overcook it or it'll turn into a weird crystallized lump of crap -- I speak from experience.

STEP 3: Hold a jumbo marshmallow by the rim and dip the top part in the chocolate, then roll it in the graham crumbs. Place the un-chocolate-ified side on the wax paper and let dry. Repeat until you run out of chocolate or graham crackers. Test them often along the way. You're not checking for anything in particular -- you're just, you know, being a responsible cook.


These were a HUGE hit at Christmas. Because really. They're fantastic.

Friday, January 6, 2012

Smores Fun, Part 1: Smores Pseudo-Martini

The other night, my hubby was like, "Make me a nightcap!" Then he went back to chewing on his pipe and reading through his monocle. Or maybe not. His actual request was, "You should make me a fancy drink and then blog about it" -- always keeping the idea mill running :)

So here's what I came up with, despite that fact that my bartending experience is limited. (This is an understatement. I only have a 70% success rate working a bottle opener, let alone preparing actual drinks.) I was going to call this a "smores martini," but I think a martini has to have vermouth...? Whatever. It's a delicious smores-inspired beverage served in a martini glass.

You'll need:

  • 1 oz. tasty vodka (chocolate, vanilla, marshmallow)
  • 1 oz. Baileys Irish Cream
  • chocolate syrup
  • 1 oz. half and half
  • 1 oz. milk
  • graham crackers and marshmallows (for garnish) (I just like saying "for garnish")


Obliterate the graham crackers. Rim the glass with the cracker crumbs. You can use milk or icing to make it stick.


Squeeze some chocolate syrup into the bottom of the glass.


Mix the beverage-y stuff in a shaker (or in your gym water bottle, whatevs) and pour into a martini glass. Dress it up nice with some marshmallows on a skewer et voila*, you have a smores martini that's not really a martini.


Cheers!

* No idea if I used that correctly.